Organizing your library
Everything here works on a whole selection, and each action is one step of Edit > Undo (⌘Z). The Sample menu has the right-click menu's commands too, so a selection can be organized from the keyboard.
Favorites and collections
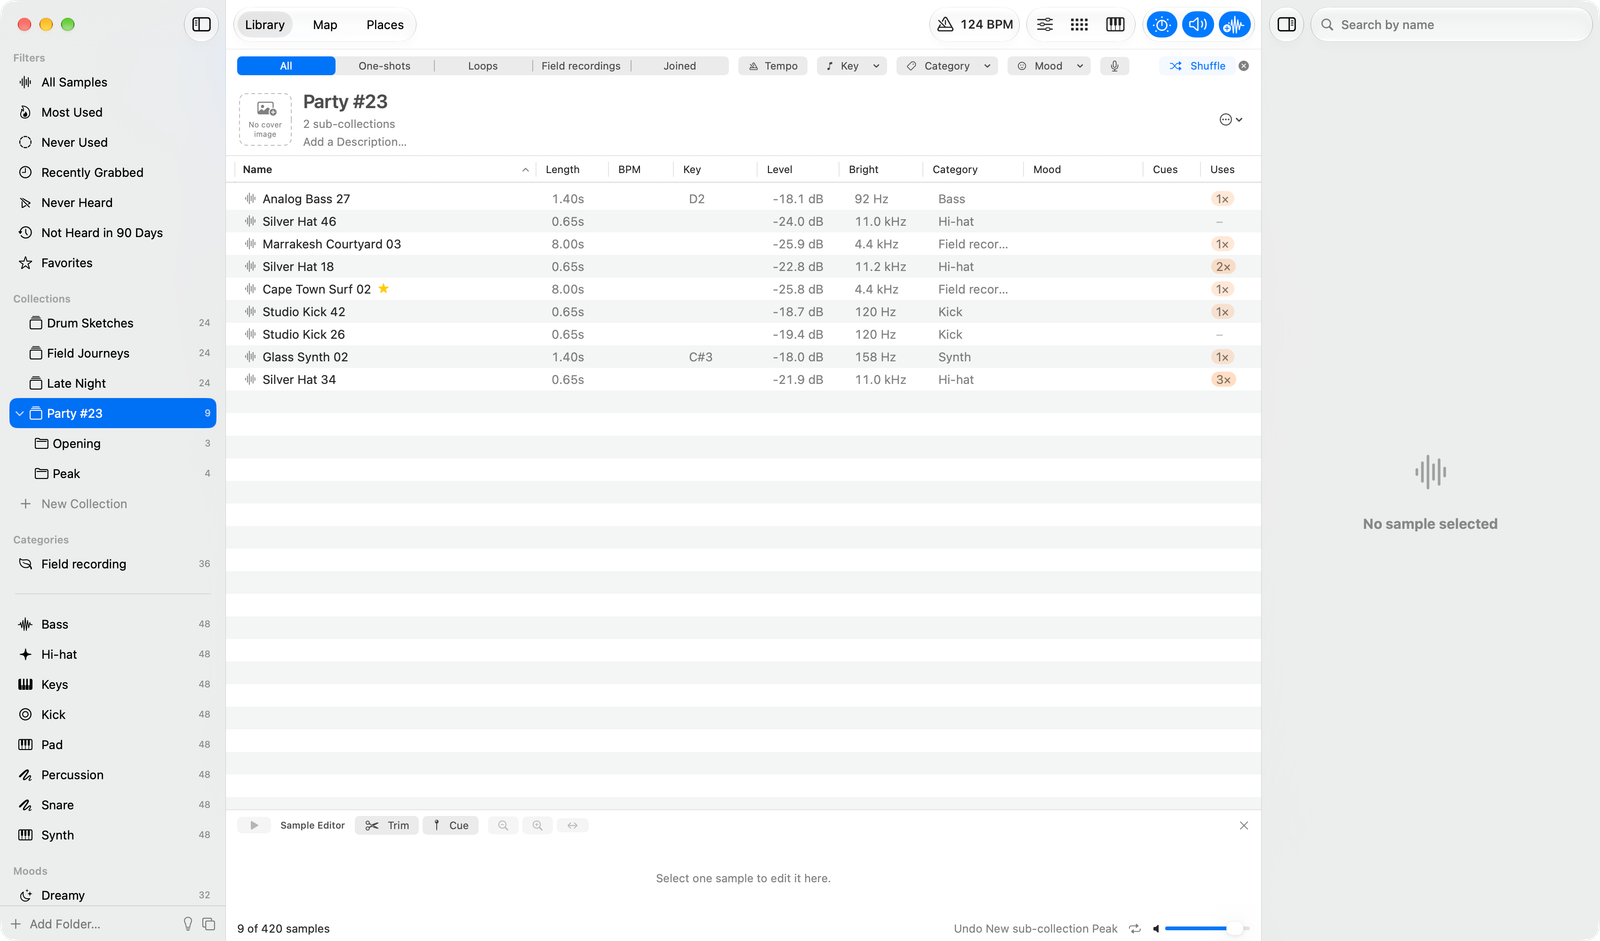
Press F to star a sample. Collections group samples, and a collection can hold sub-collections, one level deep: right-click it and choose New Sub-collection… ("Party #23" with "Opening" inside it). A collection that has sub-collections shows an arrow to show or hide them, and the left and right arrows do the same while it is selected in the sidebar. Picking a collection lists its own samples and those of its sub-collections. Move Into and Move to Top Level are in the right-click menu. Deleting a collection never deletes samples or files, and Undo brings it back.
Tags and categories
Add free-text tags to any selection; they are searchable and listed in the sidebar. A tag has one spelling: adding Kick where kick is already used reuses kick, so the sidebar lists the tag once. Set Category and Set Mood change what the app guessed.
Duplicates and hidden samples
The sidebar's duplicates button finds identical files, keeps the best copy and hides the others. Hidden samples are under the Hidden filter and can be shown again; files are never deleted.
The sidebar
Filters, Collections, Categories, Moods, Tags, Drives and Folders can each be folded, moved and hidden. Hover a section's title and click its arrow to fold it, or right-click the title. With the sidebar focused, the left and right arrows close and open what the selected row holds, just like the arrow beside its name: a folder's folders, a collection's sub-collections, a set's banks or the folders of a drive's Pool. Settings > Sidebar (⌘,) lets you drag the sections into order and uncheck the ones you don't want; Reset brings them all back.
Copy samples to a folder
Copy To… (⌘E) copies a selection to a folder, with trims and sound edits applied, optionally as 16 or 24-bit, mono,
and 44.1 or 48 kHz for a hardware sampler. Name the copies from a template such as {category} - {name} - {bpm}.
Export a sample pack
Export Sample Pack… (the ellipsis above the list, or a collection's right-click menu) turns a collection into a folder you can hand to someone: the collection's name is the folder, each sub-collection is a folder inside it, and each chosen format gets its own folder. Pick WAV, AIFF or FLAC at 16 or 24 bits, or Original to keep each file as it is; Formats and File Names holds the format rows and the same name template as Copy To…. The default is WAV 24-bit at each file's own sample rate.
A file is never written at a higher bit depth or sample rate than its source, so a 16-bit file stays 16-bit in a 24-bit pack, and the sheet always says so. The originals are never changed, and a pack folder that is already there is never replaced: export again to the same place and you get Party #23 2.
Give the collection a cover image with Set Cover Image… and it appears as cover.jpg at the top of the pack; a
sub-collection's cover goes in its folder under every format. Edit Description… writes up to 4,000 characters that are
copied into a plain-text readme.txt beside the files, which lists every file with its depth, rate and library details,
the covers, the sub-collection descriptions and anything that was left out. The readme ends with Made with Arkidome and
a link to the website. The cover and the description are kept in the library, so File > Back Up Library… carries them.
Join samples
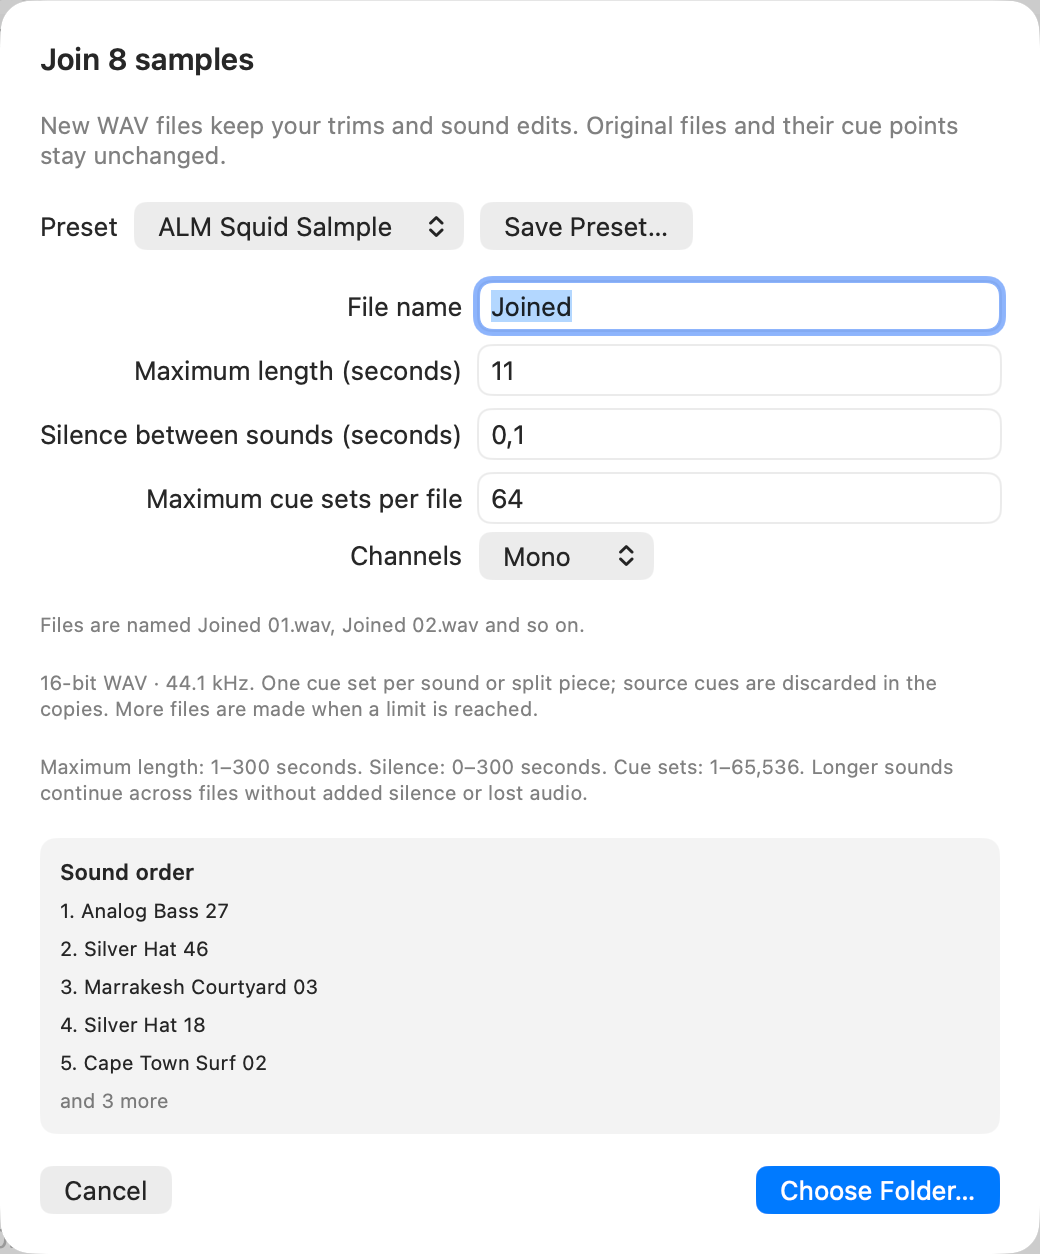
Select several sounds and choose Join Samples… (⌥⌘J). The sounds are joined into WAV files, in the list's order, with a named marker at the start of each sound and silence between them (0.1 seconds unless you change it). Set the longest file and the most markers per file, and more files are made as needed. The built-in ALM Squid Salmple preset (see Hardware) uses mono, 11 seconds and 64 cue sets; save your own presets too. Joined files appear under the Joined type filter once the folder is in the library, and expanding one lists the sounds it was made from.
Split a recording
Splitting is joining the other way round. Select one or more recordings, such as a take of kicks or a session of one-shots, and choose Split Recording… (⌥⌘P). Each one is cut at its silences into separate WAV files, one for each sound.
The sheet shows the recording's waveform with every cut marked and numbered. Two sliders move the cuts as you drag: Sensitivity sets how quiet a sound can be and still count (higher finds quieter sounds), and Minimum silence sets how long a quiet stretch must last to separate two sounds (0.1 seconds unless you change it). Press Preview or the space bar to hear the pieces one after another, or click a piece to hear only that one; the piece playing lights up. Several recordings share the sliders, and the list above the waveform picks the one you see.
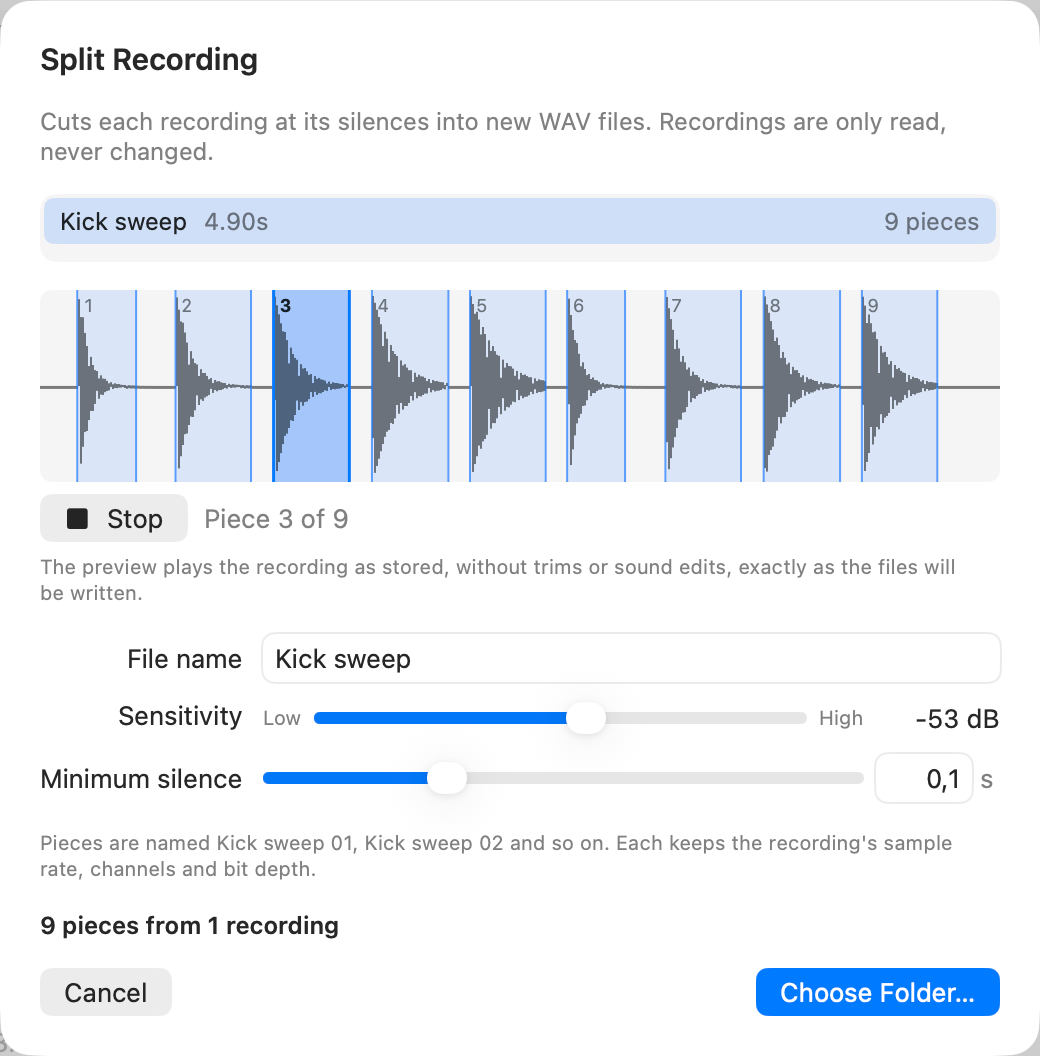
Type a File name and the pieces are numbered from it: kick gives kick 01.wav, kick 02.wav and so on, and the
numbers carry on from one recording to the next. Each piece keeps the recording's sample rate, channels and bit depth,
and gets a tiny fade at each end so a cut never clicks. Choose Folder… saves them, and the folder opens in Finder. A
folder that is already in your library is watched, so the new files show up in the library a moment later. The
recording is only read, never changed, and the preview plays it as stored, without trims or sound edits.
Write tags into files
Write Tags into File… (properties, or the right-click menu for a selection) writes the category, tags and moods
into a WAV file's own information, for other software and for a later import. The sound itself is never rewritten:
the file is copied, only its end changes, the result is checked, and only then does it replace the original. You can
keep a .bak copy. Files on a USB drive are never changed.
Removing a folder
Right-click a folder and choose Remove from Library…. The app says how many samples, favorites, tags, collection entries and cues it will forget, and the audio files stay where they are.
If a file is moved out of its folder or deleted outside Arkidome, it stays in your library marked Not Found, with its folder and name still in place; put it back and it returns. A folder that moved somewhere else keeps everything the library knew too: choose File > Locate Moved Folder…, pick its new place, and its sounds keep their tags, favorites, collections, cues and analysis. Arkidome never moves or changes your files.